Showing posts with label costumes. Show all posts

Monday, November 18, 2013

How to Make a Pirate Hat.

There are three main kinds of pirate hats – the tricorn hat, like Jack Sparrow’s, the cavalier hat, like Will Turner’s, and the Dutch hat, like Davy Jones. We are going to mostly look at the tricorn and the cavalier hats today.

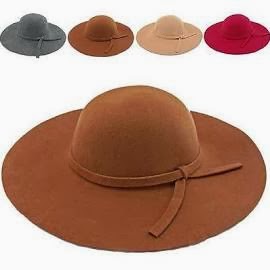
The first thing you need is a hat. For the tricorn, the go-to pirate hat, you will need a hat with a low, rounded crown (the part your head fits into) and a wide (3 ½ or 4 inches) brim. For the best look, use a wool felt hat in black or brown. You will be able to tell the material of the hat by reading the tag on the inside, along the back of the hat band. If the hat has no tag, but is “fuzzy” and feels like felt, it’s probably what you want.

Of course, any kind of hat with a brim will do. The main thing is the "tricorn" shape. 


I got my last pirate hat at a second-hand store for about $2. It needed some work, but no one has ever suspected that it started out as something else. The place to get the ultimate pirate hat blank is here here.
The slouch hat works just fine. Of course, this is still $35. You can also use a hat like this this. (I have purchased a hat from here. Delivery took a while, but it was inexpensive, and the hat was great.)


You will need an object to poke a hole in the hat. An ice pick or a knitting needle is perfect. You will need some material to tie up the sides of the hat. The very best thing you can use is shoelaces – two pairs of black or brown. This stuff is going to show, so you want to think about that when choosing color. You can also use ¼” ribbon.

Materials


Given these materials, it’s very easy to make the hat. Simply grab the back side of the brim and fold it up, toward the top of the crown. Hold it in place firmly and use the ice pick to punch four holes, like the points of a square, right through the brim and the crown.

Punching holes for lacing


Cut the shoelaces in half. The aglet on the end of each half makes a perfect tool to poke the shoelace through the tiny holes. Make two vertical stitches to sew up the side of the hat. Just poke the string through two holes and tie it on the inside. Do the same with the other two holes.

Using white lacing here so you can see it
Repeat this, putting up the sides so they meet in a point toward the front of the hat. You will find that it’s very natural for the hat brim to go up in three sections.
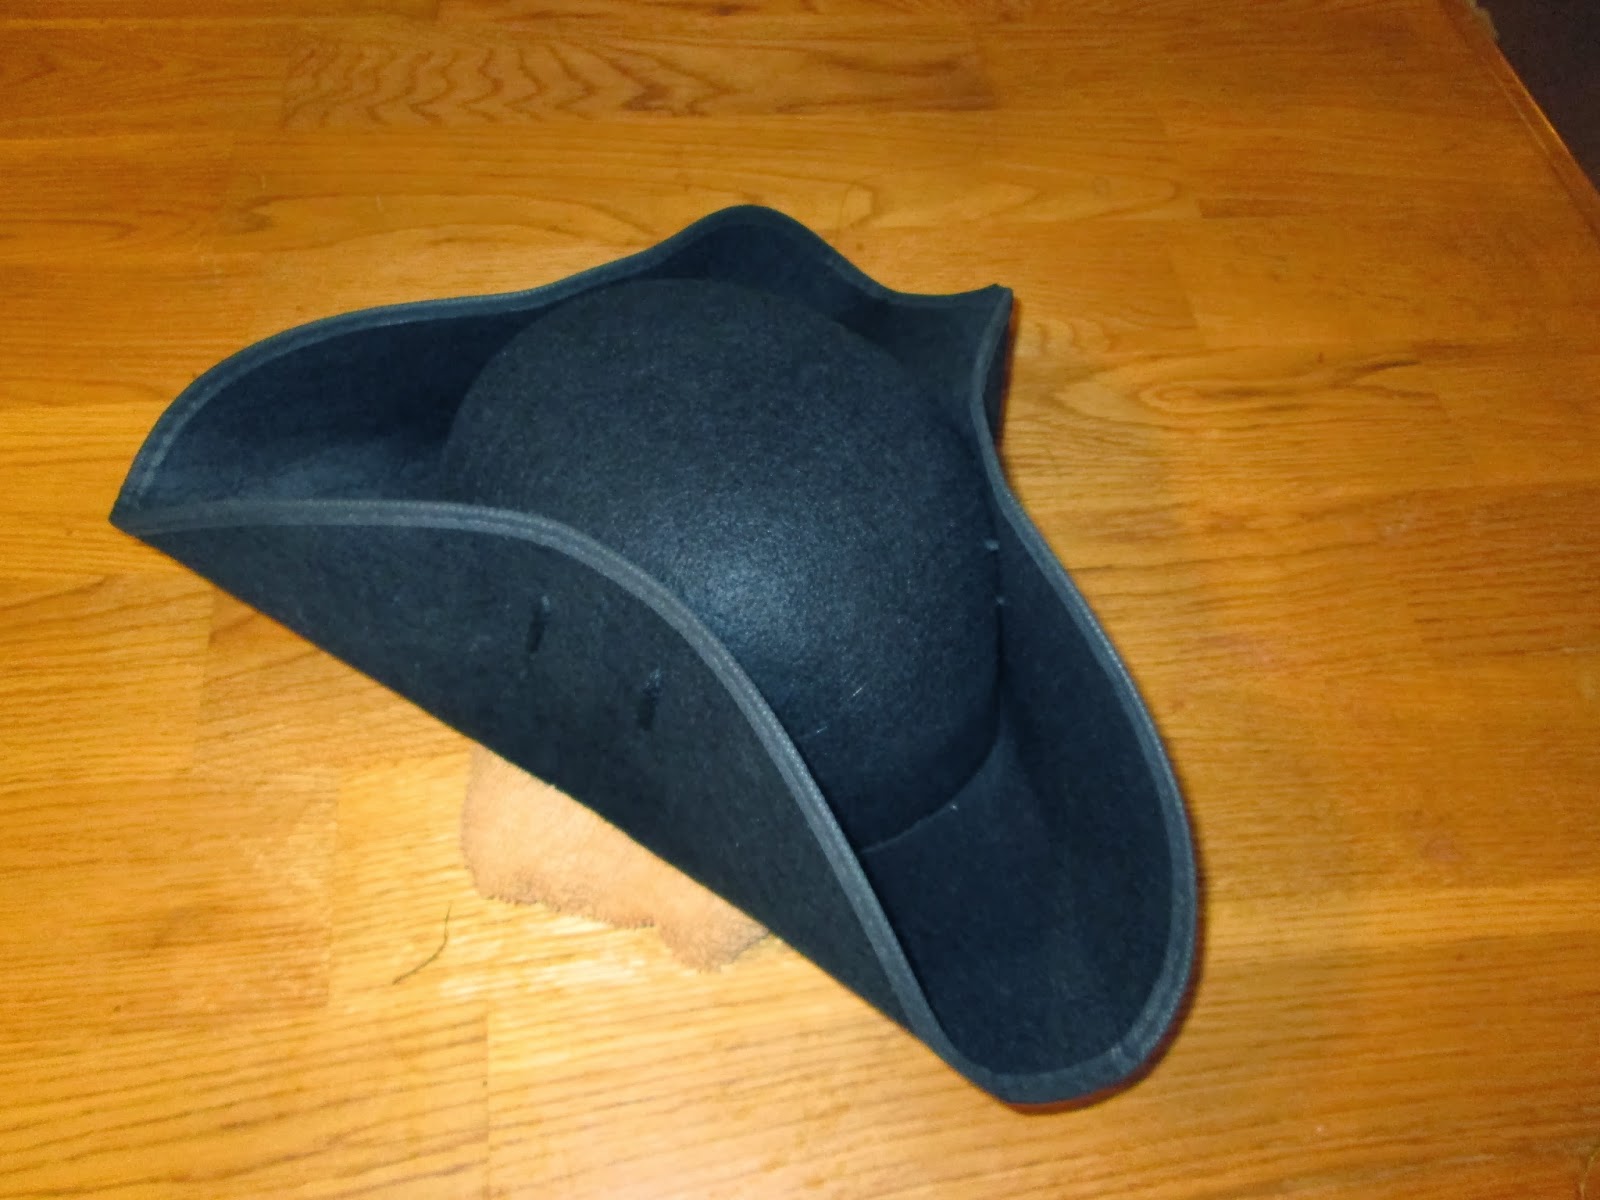


Finished hat with black lacing
Is that it? Yes it is.


Hats from this period are all based on a low, wide-brimmed form. If you start with a very wide-brimmed hat, put up only one side, and add a feather on that side, you have the cavalier hat. If the brim is slightly narrower, and you put up 3 sides, you get the tricorn.


If you cut the tip off the tricorn, you get the Dutch hat. Why would you cut the tip off the tricorn? Well, wear the hat for a while, and bump the tip into a few things, and you’ll see why. If you want this type of hat, first put it up in the tricorn shape, then mark the area you want to cut off with chalk, then take the brim down and cut. This hat works best if you put trim around the edge of the hat brim.

Notes for hats
If the hat you are working with is too stiff to bend, steam it or wet it with warm water, and work with it while it’s damp. If it is too soft, fabric stores sell a product called fabric stiffener, which you can use as directed to fix it.

If the crown of your hat isn’t the shape you want (my last pirate hat started out with a shape more like a cowboy hat) change the shape by filling the crown of the hat with warm water and letting it sit for a few minutes. Then use your fist to punch the hat into shape. You can also make a too-small hat bigger by wetting it and then forcing it onto your head and wearing it until it’s dry.

If you do this, be careful. Any kind of wetness weakens the fabric of the hat. You can accidentally put your hand right through it. I was working with a $2 hat, so I had little to lose.

If you want to put trim around the edge of your hat brim, put it on the underside of a tricorn because that is the side that will show. On a cavalier hat, you must put it on both upper and lower sides of the brim, as both will show. It’s best to sew it on with a sewing machine, using a zig zag stitch, but hot glue will do.

Real tricorn hats were never worn with feathers in them, but you’re a pirate. Feel free to deck your hat out with feathers or gems. One big pin is a popular option, usually put on the left hand side. A huge feather is traditional on a cavalier hat, sweeping out behind. Once again, a big pin is a great accessory.


If you can’t find a felt hat, most fabric stores sell a kind of wide-brimmed straw hat that also makes a fine pirate hat. (If you watch the background of the Pirates of the Caribbean movies, you will see people wearing tricorn straw hats)  Just make sure it fits. If you want to paint a straw hat, you can use regular spray paint. A straw hat looks better as a grungy pirate hat.


Pirates aren’t limited to only one kind of hat. Society at the time said that men wore hats. Pirates stole gentlemen’s hats and then wore them until they fell apart, so if your hat has seen better days, so much the better. If it needs to be grunged up a little, grease, spray paint, or actual dirt can be used. Sand paper can simulate wear. And rubber cement can simulate sweat stains on the crown.

Whatever you do, have fun. And if you enjoyed this post, and would like to support pirates and this pirate blog, click the links in the sidebar to buy a copy of Gentlemen and Fortune, the first book of my novel series, The Pirate Empire.


Monday, October 14, 2013

How to Make a Pirate Shirt

Halloween is right around the corner, and I wanted to give all you pirate fans a chance to make a pirate shirt in time for the holiday.

This would be a fine project for a person with just a little sewing experience. Shirts from this time were made much differently than modern dress shirts. There doesn’t need to be much cutting. Almost all the lines are straight, so you can just tear the fabric to get a perfectly straight line.


You will need:
4 ½ to 5 ½ yards of woven fabric in cotton or linen (depending on how large a shirt you will make)
A long sleeved, button down shirt that fits the person you are making the pirate shirt for.
Scissors
Pins
Needle and thread
Sewing machine (if possible)

An off-white color looks more pirate-y than a pure white shirt. Calico is also appropriate for a truly period shirt. Sailors also wore red shirts at this time, although a historically correct color would be a tomato red, rather than a blood red. Black also looks good for a pirate, or dark brown, though neither were actually used at the time.


Cut a front and a back, which are the same size. You may use the old shirt for guidance. Otherwise, measure the diameter of the wearer at the widest point (shoulders, bust or tummy) and add 12”, then divide by 2. This is your width. Length is about 30”

Cut 2 sleeves. Use the shirt to gauge length, but make then 30” wide.
Cut a collar piece, 20” long by 6” wide.
Cut 2 cuffs, each 10” long by 4” wide.
Cut 2 gussets, each one a 4” square.
Cut 1 more 4” square, and then cut it on the diagonal, to make 2 triangles.

The basic design is a straight front, and a back that his gathered at the neckline. The shoulders extend past the wearer’s natural shoulder. The sleeves are very wide and gathered at the top, where they join the shirt. Notice that the front of the shirt doesn’t open all the way down. Also notice that this shirt does not have a button closure on the sleeve cuff. Make sure the wearer can get his hand through the opening, and if necessary, cut another cuff piece and make a wider cuff opening.

Step 1
Take the front and back pieces and lay them together, one on top of the other. Pin and sew the top edges together along the shoulders, from the outside in, for seven inches only. This will leave a very wide neck hole.


Step 2 Designate one Piece the front. On this piece only, find the center, and cut a straight line from the top edge down 10 inches. This will be the front of the neck opening.


Step 3
On each sleeve, sew a gathering seam 1/2" from the edge, along one of the long (30") sides.
On the opposite side, sew another gathering seam, 12" long, centered on that side.


Step 4
Gather the long seam and attach the cuff. Repeat on the other sleeve.

Step 5
Starting at the cuff, pin the raw edges of cuff and sleeve together, closing the sleeve into a tube. Leave 4" open at the side opposite the cuff.


Step 6
With the sleeve still  inside-out finish the cuff by rolling the outer raw edge back, and hand stitching it to the seamline where the cuff meets the gathered edge of the sleeve.

Step 7
Open the 4" unsewn area at the other end of the sleeve. Pin the 4" side of the square gusset to one side, and the adjoining 4" side of the gusset to the other side, as shown. Sew.


Step 8
Gather the top of each sleeve, using the 12" gathering seam inserted in step 3

Step 9
With the sleeve right side out and the body of the shirt inside out, put the sleeve inside the shirt. Line the top of the open sleeve edge (opposite the gusset) up with the shoulder line of the shirt and pin the opening of the sleeve to the shirt. Stitch the sleeve in place. Repeat with the other sleeve. Now, when you turn the shirt right side out, the sleeves will be properly placed.


Step 10
Sew a gathering seam all along the back of the neck hole, from shoulder to shoulder, and draw in the backof the neck.


Step 11
Finish the 10" cut down the center front by rolling the edges under and stitching them down.


Step 12
Stitch one of the triangular reinforcements over the end of the center cut, tucking the edges under for a finished look. (This is easier to do by hand-sewing.)


Step 13
To attache the collar, pin the center of the collar piece to the center of the gathered back neck opening. Pin the front edge of the collar to the finished edge of the front opening, leaving 1/2" of collar for hemming. Pin the length of the collar along the neck opening, adjusting the gathering at the back so that the collar fits the neck opening. Repeat on other side.


Step 14
Hem the sides of the collar. Turn collar right-side out and roll the unfinished edge under. Whip stitch the open side of the collar to the shirt neck.

Step15
Sew the sides of the shirt closed, and hem the bottom.


Well, there we have it, instructions for making your own pirate shirt! Please leave feedback in the comments, and I'll try to clarify anything that's hard to understand. I'm also uploading a video of this shirt to YouTube. Click here to see it. Please watch and comment. (But be easy on me this is my first instructional video!)

Next week: Back to Sam Bellamy's exploits in the Caribbean.


Wednesday, February 13, 2013

When Guns Don't Fire


In my last post, I wrote about how flintlocks work. Today I will give details about how they don’t work.

Although they are sturdy, they are not reliable. In the mid-1700’s the British Army did a study, and found that a gun fired in the field had an 85% chance of actually going off. That leaves a 15% chance that when you pulled the trigger, nothing was going to happen. What got in the way?

If the powder isn’t dry, nothing will happen. High humidity might be enough to keep a spark from igniting the flash pan. Or the flint might not be sharp enough or set at the proper angle. To get a good spark, the flint needed a sharpened strike point. Flints were purchased with correct faces, but flint is a rock, which chips and breaks, so the flint must be cared for, re-sharpened, and replaced regularly.
Another problem was that the frizzen strike plate might not be the best grade of steel. These were individually produced parts, and if the frizzen was not properly tempered, the spark would be inferior or nonexistent, and might not ignite the powder.

Holding the pistol incorrectly could prevent firing. You couldn’t “go gangsta” and hold your flintlock sideways. Gravity needed to guide the spark into the flash pan. Holding the weapon upside down made it useless, and might spill the powder from the flashpan, preventing firing altogether until the pan was refilled.

Rain reduced chances of success. Wind might blow the spark out. If the touchhole had carbon buildup, or the load had not been tamped down properly, or the flint was not positioned correctly, then the pistol would not fire. It is a telling fact that the makers of pistols did not also provide holsters. They made wooden cases for their product.

But pirates loved pistols, and evidence surfaces that many pirates collected them. Pistols were terror weapons. They were loud. They made smoke and inspired chaos. Pistols were, moreover, the weapon of a “gentleman,” and such a weapon in the hands of a dirty, uneducated criminal sent a message that rules of society were being turned upside down. And setting the world on its ear was a pirate’s goal.

Unlike navy pistols, pirate weapons were private property. This was important, since each pistol had its own individual quirks, and close study of it could reveal the way to produce maximum reliability. If some weapons responded to use of a particular grade of flint, or dropped a spark more reliably when held at a slight angle, the longtime owner would know. The rules of most pirate ships required weapons to be cleaned, maintained and ready for use at all times, and circumstances indicate the pirates cared for their weapons enthusiastically.

Pirates also modified pistols to suit them. For example, the smooth hardwood grips made to appeal to gentleman purchasers did not work well for a pirate, whose hands might be sweaty, wet, or covered in blood. Pirates wrapped their pistol grips in cloth, favoring silk ribbon for the purpose.


They also carried as many guns as possible. Though belt holsters had not been invented, pirates used over-the-shoulder bandoliers, rigged to carry up to three weapons. Two of these provided six shots. Another pirate invention was a sort of V-shaped neck-bandolier, also holding six weapons, and featuring a pouch in front for powder and shot.

If this sort of fancy leather- work wasn’t available, braces of pistols were tied together by the butts and simply slung around the neck. Three pairs were about all a person could carry, and may have been the conceptual ancestor of the six-shooter. More pistols could be crammed into coat pockets, More is better, especially when you have only an 85% chance of getting a shot off.